
System Settings
This chapter describes global system settings, such as timezone, SSL certificates, authentication and maintenance settings. Also, such sensitive settings, as removing stored data logs.
System settings are available for a user with
superadminrole only.
Date and time
System events registered by Fudo One (sessions, system log events, etc.) are timestamped. Fudo One can obtain the time information either from an NTP server or the system clock.
It is strongly advised for the date and time settings to be obtained from a reliable NTP server. Changing date and time settings manually may result in system malfunction.
Changing date and time settings
Manual time setting is disabled if there are NTP servers configured.
To change the Fudo One's system clock settings, proceed as follows.
- Select Settings > System.
- Change date and time parameters in the Date and time section.
- Click Save.
Time servers configuration
NTP servers ensure that the system time on all IT infrastructure devices is synchronized. Using NTP servers guarantees that the timestamp of the recorded session matches the time settings on the monitored server.
Adding an NTP server definition
To add an NTP server definition, proceed as follows.
- Select Settings > System.
- Click the + button in the NTP servers section to add an NTP server.
- Enter NTP server IP address or host name.
- Click Save.
- Select Restart from user menu to reboot Fudo One and apply new time settings.
After every change or removal of the NTP server definition, run the Restart option.
SSL certificates
SSL certificate allows prevent phishing attacks.
Fudo One requires using unencrypted keys to the certificate. In this case a user is not obligated to input its password at every restart. Check how to decrypt a password protected RSA private key.
Configuring SSL certificate for Fudo administration panel
- Select Settings > System.
- In the Fudo HTTPS certificate section, click the Browse button next to the HTTPS Certificate field and point to the location of the SSL certificate file in PEM format.
- Click the Browse button next to the HTTPS Private Key field and point to the location of the SSL key definition.
- Click Save.
Configuring user portal SSL certificate
- Select Settings > System.
- In the Fudo HTTPS certificate section, click the Browse button next to the HTTPS Certificate field in the HTTPS certificate section and point to the location of the SSL certificate file in PEM format.
- Click the Browse button next to the HTTPS Private Key field and point to the location of the SSL key definition.
- Provide Private key passphrase.
- Click Save.
Configuring user portal CA certificates
- In the User portal CA certificates section, click the Browse button next to the CA certificates field and point to the location of the CA certificates. These certificates allow users login in to the Access Gateway.
- Click Save.
User authentication and sessions
Defining default domain
- In case the default domain is specified and the user does not have a domain defined, when logging in, the user can either include the domain (e.g.
john_smith@domain) or leave it out (e.g.john_smith).- If there are two users with the same login, one of which has the domain configured the same as the default domain, and the other does not have the domain defined, if the user provides the domain, Fudo One will match the user that has the domain explicitly specified.
- In case the user does not provide the domain, Fudo One will match the user that does not have the domain explicitly specified.
- Select Settings > System.
- In the User authentication and sessions section, provide the default domain.
- Click Save.
Deny new connections
Enabling this option results in a denial of all new connections requests.
Proceed as follows to block new connections:
- Select Settings > System.
- Select the Deny new connections option in the User authentication and sessions section.
- Click Save.
Password complexity
Fudo One enables defining static passwords complexity enabling you to enforce passwords that meet your internal regulations.
Defining password complexity
- Select Settings > System.
- In the User authentication and sessions section, select Authentication failures to set a counter of the login failures.
- Define the minimum number of characters.
- Select Small letters and provide the minimal number of small letters in the password.
- Select Capital letters and provide the minimal number of capital letters in the password.
- Select Special characters and provide the minimal number of special characters in the password.
- Select Digits and provide the minimal number of digits in the password.
- Select the Different password than current option to enforce a password different from the current one.
- Click Save.
To enable static password complexity for a particular user, select the Enforce static password complexity option in the Authentication section on the user form.
Enabling password complexity will trigger password change for users with the Enforce static password complexity option enabled whose passwords do not comply with the complexity settings.
The password will have to be changed upon logging into the Access Gateway.
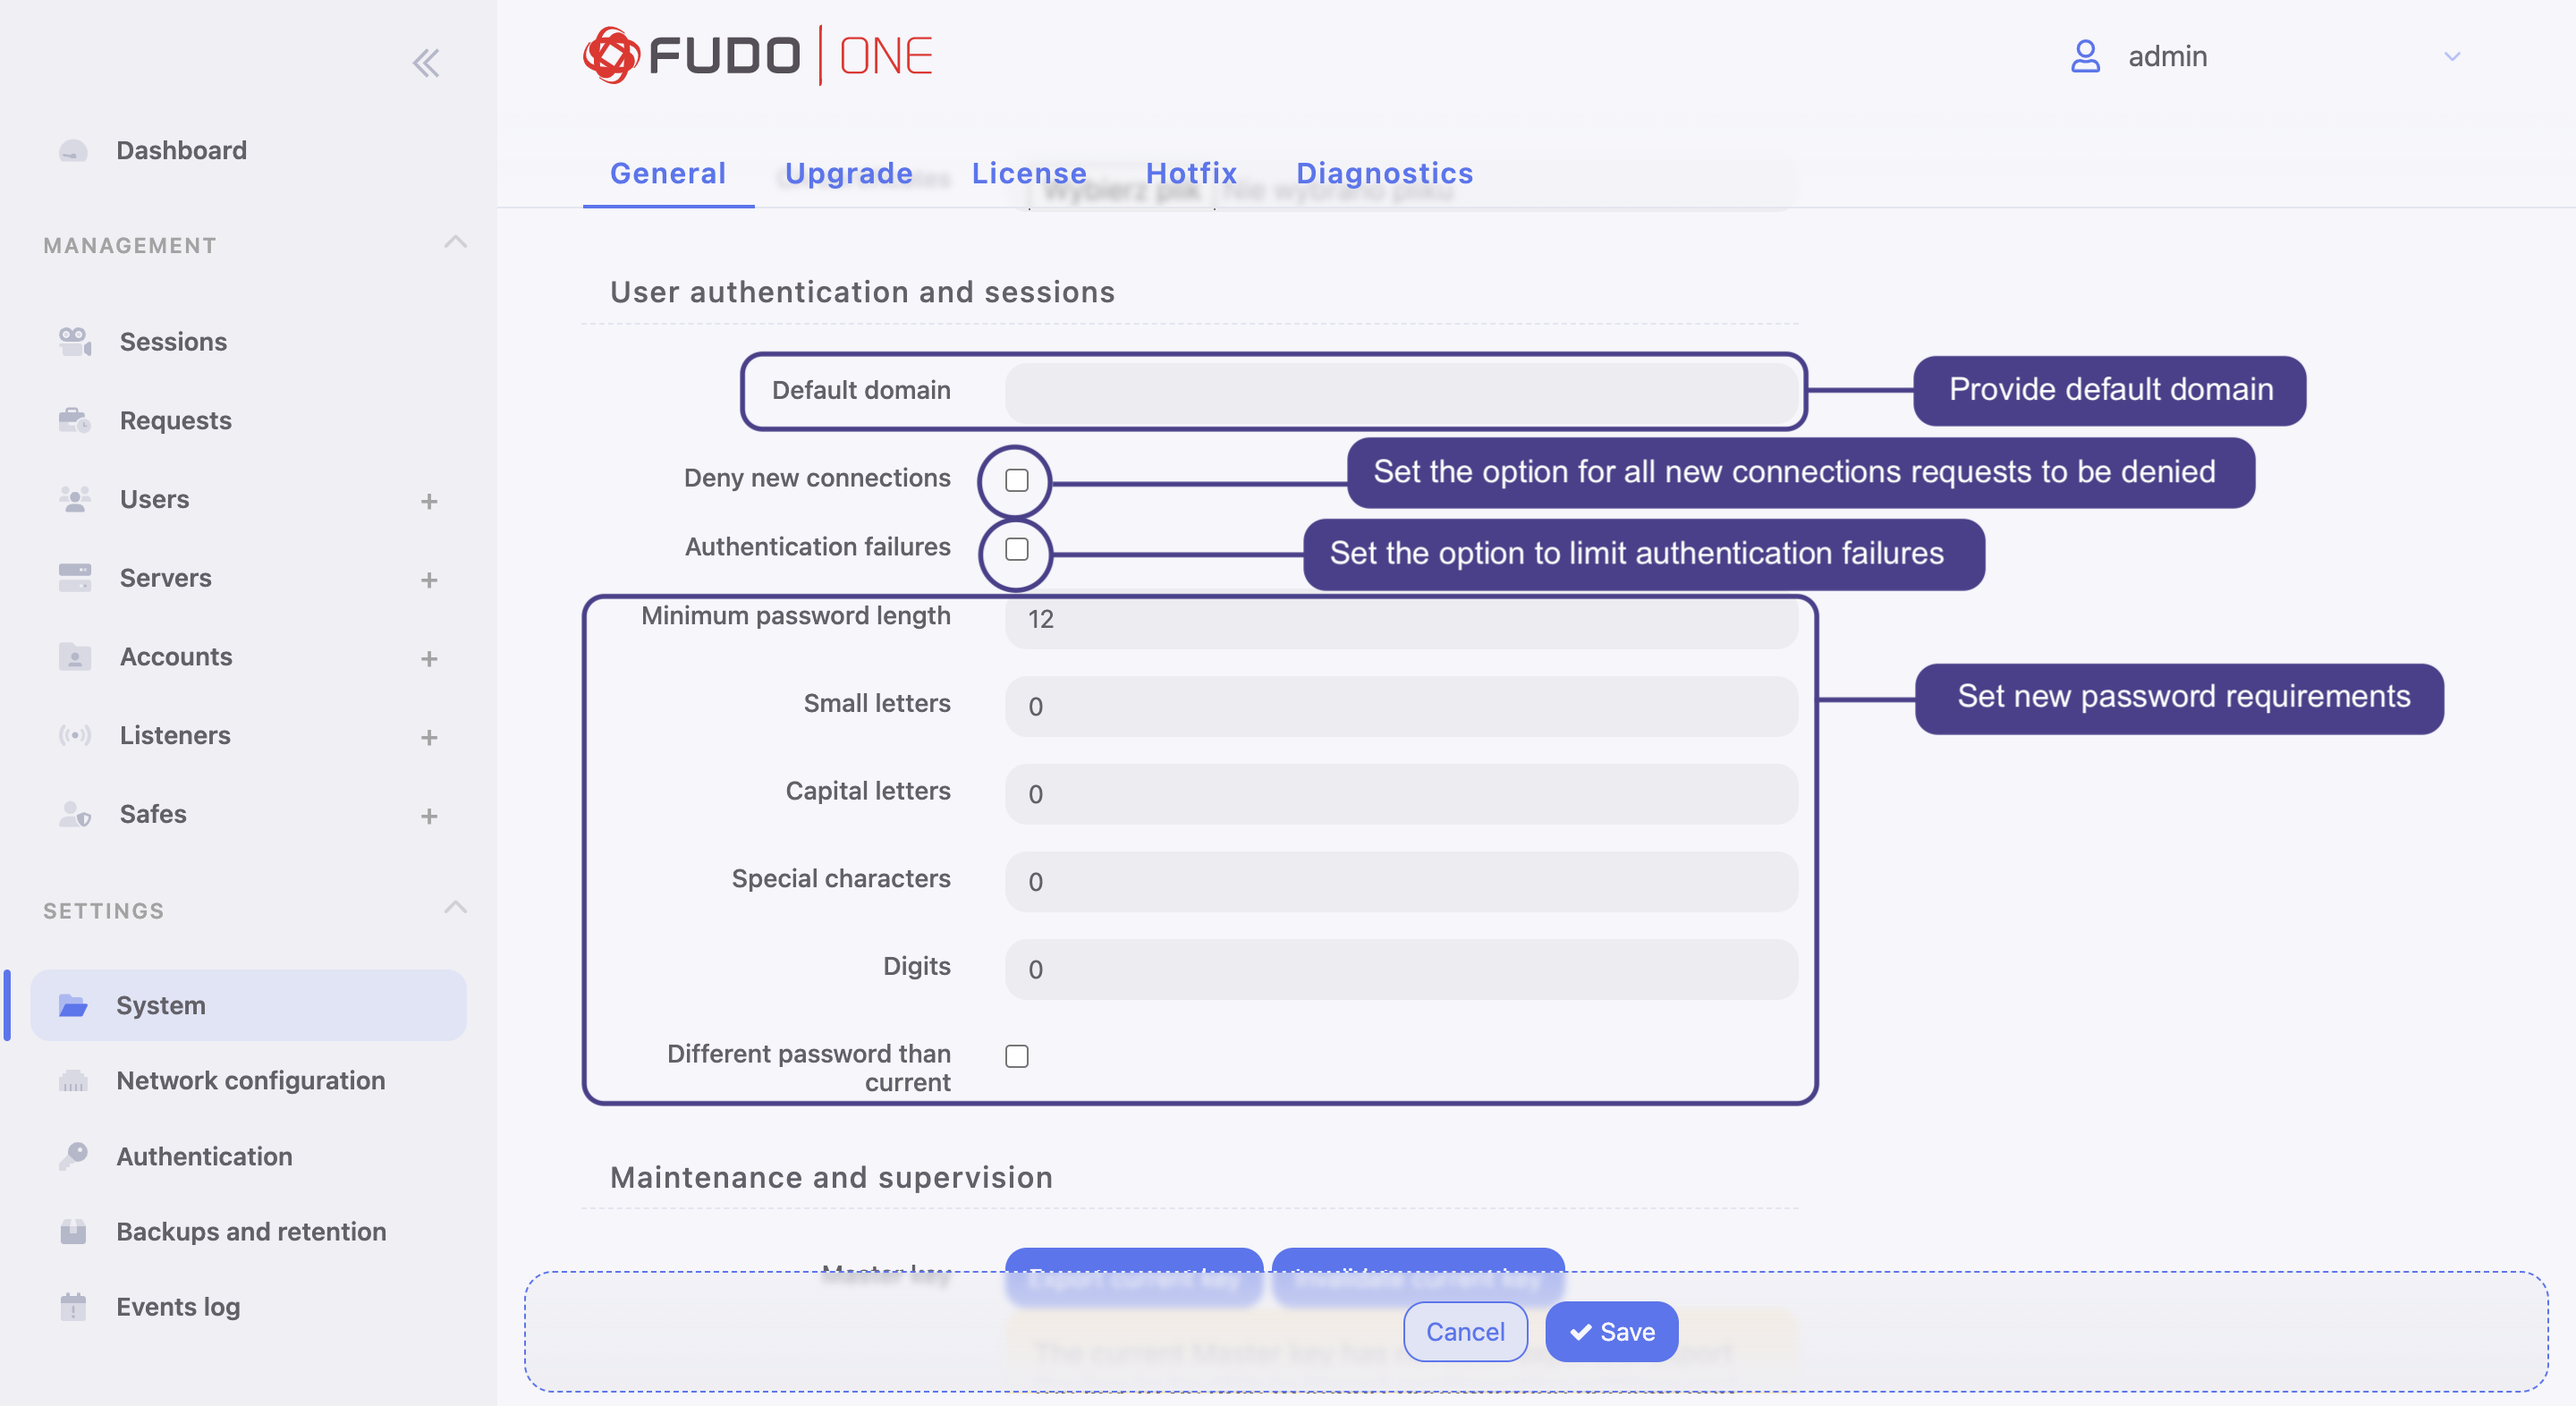
User authentication and sessions options
Maintenance and supervision
The Master key enables encrypting sensitive configuration parameters, system backups and external storage volumes. It also allows for recovering internal storage encryption key in case the pen drives containing encryption key are lost or damaged.
- The Master key is exported to PEM format and it is encrypted with SMIME using administrator’s public key/certificate.
- It is essential to have the Master key exported and stored in a safe location.
- In case the Master key has been compromised, you can invalidate it, which will result in generating a new one and re-encrypting the data.
Exporting master key
- Select Settings > System.
- In the Maintenance and supervision click Export current key and save the file on the file system.
- Click Choose file and browse the file system to find the certificate that will be used to encrypt the Master key.
Generate the keys and the CSR (Certificate Signing Request) using openssl:
openssl req -newkey rsa:4096 -keyout privkey.pem -out req.pem openssl req -nodes -newkey rsa:4096 -keyout privkey.pem -out req.pem # Do not prompt for a password.Sign the CSR:
openssl x509 -req -in req.pem -signkey privkey.pem -out cert.pem
- Click Confirm and save the the Master key file.
Invalidating current master key
In case the current Master key has been compromised, you can invalidate it. Invalidating the current Master key generates a new one and triggers data re-encryption.
- Select Settings > System.
- In the Maintenance and supervision click Invalidate current key.
- Click Confirm to proceed with invalidating the current key and re-encrypting the data.
- Make sure to export the newly generated key.
SSH access
SSH access option enables remote access to Fudo One for servicing and maintenance purposes.
The default port number for service access over SSH protocol is 65522.
To enable SSH access, proceed as follows.
- Select Settings > System.
- Select the SSH access option in the Maintenance and supervision section.
- Click Save.
Sensitive features
Sensitive features is a set of options enabling which requires a consent from two users with superadmin role.
Keystrokes are not displayed in the session player by default. Enabling keystrokes display requires a consent from two users with
superadminrole.
To enable sensitive features, proceed as follows.
- Select Settings > System.
- Select Show keyboard input in the Sensitive features section to initiate the feature.
- Select the Enable logs data removal option. This option is combined with Retention settings, where you can specify when logs data should be removed.
- Click Save.
Notify another system administrator that the features mentioned above have been initiated and require a confirmation.
Updated about 1 year ago